

This is such a great idea for letting imaginations run wild. Personalise with some embroidery and throw in some fun things like torches, glow sticks, magnifying glasses or maybe even a book!
Shopping list
- Embroidery Machine with hoop
- A sheet (or quilt cover cut in half)
- A pillowcase
- Coordinating Threads
- Rope (5mm width), pegs, torch and other fun items for building!
- Pins
- Stabiliser
- Scissors
- NOTE: We purchased a queen quilt cover set and cut the quilt cover in half to make 2 blanket forts!
Cutting:
- Cut the pillow case open down the length of the sides to make a long strip.
Embroidery:
- Hoop the stabiliser and the pillow case in the embroidery hoop. Ensure the pillow case is hooped to one end. This will become a drawstring bag to keep the fort in.
- Choose the alpha-numeric setting on the embroidery machine and select the largest font size in your preferred style. For this embroidery I used cursive as the first text for the child’s name. Enter the name into the machine. Rotate the text to sit lengthways on the hoop, and move to the ‘top’ of the pillowcase. Thread with your desired colour and start the stitching.
- Choose the alpha-numeric setting on the embroidery machine and select the largest font size in your preferred style. For this part of the embroidery we used block letters in a coordinating thread colour. Enter the word’s ‘BLANKET FORT’ into the machine. Rotate the text to sit lengthways on the hoop, and move to under the child’s name that is already stitched out. Thread with your desired colour and start the stitching.
- Remove the excess stabilizer.
- NOTE: You can turn off the thread cutting by entering the settings feature on the EM200 and SE300 Legacy.
Sewing:
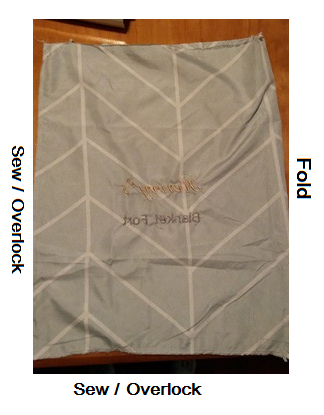
- Overlock the top edge – but do not stitch them together!
- Fold the overlocked edge down by 2cm and stitch, leaving a 5 cm gap to thread the rope into to use as a drawstring. We left the gap at the side of the bag. For more detailed instructions on creating a drawstring bag click here.
- Cut a length of rope double the width of the bag, plus about 20cm extra and thread through the opening.
- Add the sheet, torch, pegs and additional lengths of rope into the bag and ‘voila!’

- NOTE: If you used a queen quilt cover cut in half you will need to overlock or hem the edge as well!