Tension should be adjusted properly when sewing with an overlocker. If the stitch is not correct, check for proper threading before turning the tension dial.
Even if only one thread has been snagged or has slipped out of a thread guide, it can appear that the tension needs adjusting. If a machine that has been sewing with correct tension after the thread is changed check the threading before adjusting the tension dials.
When learning how to adjust the tension, thread the machine with colours of thread that match the colour coding on the machine. This helps you to visualise and understand each thread path and how the threads interact with each other.
Practice Adjusting Thread Tensions
When the overlocker stitch has poor tension, only one thread may need adjustment. Adjust too tight threads first as they may cause the other threads to seem loose even when they are not. Learning to adjust the correct thread or threads takes practice.
Overlockers have the tensions preset at the factory for basic seaming. If the machine has numbered tension dials, write down the preset numbers before practicing.
Your instruction manual may also give recommended settings for all stitch types. Although factory and recommended settings will not give perfect tension for all fabrics, they do provide a good point of reference, especially for beginners.
Practice adjusting the tensions by sewing on a long strip of fabric. Start sewing, and slowly turn the tension dial for one of the threads to a lower number. As you sew, examine the stitches to see the change in tension. The thread that has been adjusted will be slack or loose. Return the tension dial to the original setting.
Continue to sew, turning the same tension dial to a higher number. Examine the sample again to see how the tension has changed. The fabric puckers when one of the threads it too tight. Return the tension to the original setting. Continue to turn tension dials, one at a time, to see how each thread affects the stitch.
When looper tensions are correctly adjusted for a balanced overedge stitch, two opposing threads lock together at the edge of the fabric. When needle tensions are correctly adjusted, the threads rest smoothly on the top and are slightly visible on the underside. Looper threads form small relaxed loops. Compare your stitches to the pictures below if you are uncertain about which tension dial needs adjusting.
Tips for Analyzing Tension Problems
4-thread Overlock Stitches- If fabric puckers lengthwise, one or both needle threads are two tight.
- If fabric puckers crosswise under stitches, one or both looper threads are too tight.
- If a looper thread can be moved easily or if it appears uneven, the looper thread is too loose. If a needle thread forms loose loops on the underside of the fabric or if the seam pulls open, the needle thread is too loose.
- If threads lock on the upper side of the fabric, either the upper looper threads are too tight, pulling the upper side, or the lower looper threads are too loose, spilling over the edge.
- If threads lock on the underside of the fabric, either the lower looper threads are too tight, pulling to the underside, or the upper looper threads are too loose, spilling over the edge.
- If fabric puckers, one or both threads are too tight. Adjust each dial separately to determine which thread needs to be loosened.
- If either thread can be moved easily or appears uneven, it is too loose.
- If fabric puckers, one or both threads are too tight.
- If either thread can be moved easily or appears uneven, it is too loose
- If threads lock on the upper side of the fabric, either the looper thread is too tight, pulling to the upper side, or the needle thread is too loose, spilling over the edge.
- If threads lock on the underside of the fabric, either the needle thread is too tight, pulling to the underside, or the looper thread is too loose, spilling over the edge.
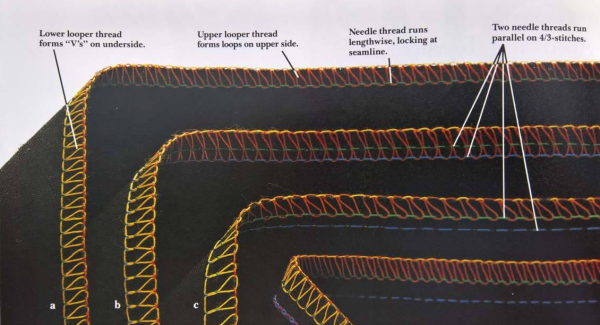
3-thread and 4-thread Overlock Stitches
The 3-thread overlock and the mock safety stitches are adjusted the same way. The overlock stitch (a) uses one needle to secure the stitches, and the mock safety stitches use two needles.
There are two types of 4-thread mock safety stitches; on one, the upper looper thread locks at the left needle thread (b), and on the other, at the right needle thread (c), depending on the model. 4-thread mock safety stitches are suitable for seaming wovens. Because these stitches stretch, they are also ideal for knits. The extra needle in in the mock safety stitch make it stronger than the overlock stitch.
Tension Adjustments 4-thread mock safety
| Upper Looper Thread too Tight Upper looper thread (orange) pulls the lower looper thread (yellow) to upper side of fabric causing fabric to pucker or curl under the stitches. Loosen the upper looper thread tension dial until the looper threads lock at the edge. |  |
| Upper Looper Thread too Loose Upper looper thread (orange) spills over cut edge to underside of the fabric. Upper looper threads are slack and can be moved easily. Fabric does not pucker or curl under stitches. Tighten upper looper thread tension dial until looper threads lock at the edge. | 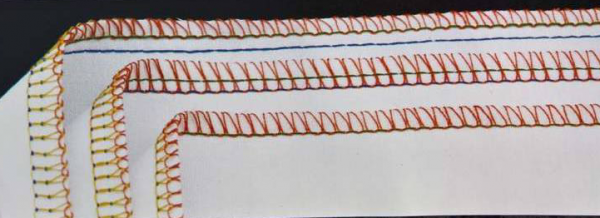 |
| Lower Looper Thread too Tight Lower looper thread (yellow) pulls upper looper thread (orange) to the underside of the fabric, causing fabric to pucker or curl under stitches. Loosen lower looper thread tension dial until looper threads lock at the edge. |  |
| Lower Looper Thread too Loose Lower looper thread (yellow) spills over cut edge to upper side of the fabric. Lower looper threads are slack and can be moved easily. Fabric does not pucker or curl under stitches. Tighten lower looper thread tension dial until looper threads lock at the edge. |  |
| Both Looper Threads too Tight Both looper threads (orange and yellow) may lock at the edge, but fabric is puckered or bunched under the stitches. Stitches are narrower than stitch width setting on the overlocker. Loosen both looper thread tension dials until fabric is smooth under the stitches. | 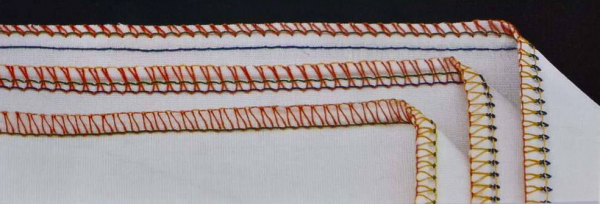 |
| Both Looper Threads too Loose Both looper threads (orange and yellow) extend over cut edge in loose loops. Tighten both looper thread tension dials until threads hug the edge. | 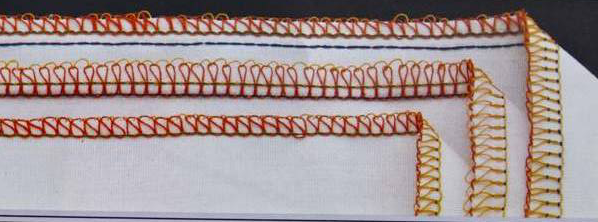 |
| Needle Threads too Tight Fabric puckers lengthwise. Loosen one or both needle threads (blue and green) tension dials until fabric lies smooth without puckers. Test stitches in knit fabrics by stretching; loosen needle thread tension dials, if necessary. | 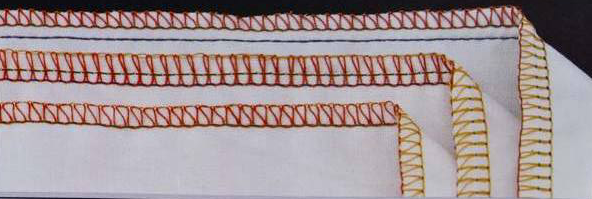 |
| Needle Threads too Loose Needle threads (blue and green) form loose loops on the underside of fabric (a). Seam pulls open on the right side, exposing stitches (b). Tighten one or both needle thread tension dials until seam closes without puckers. | 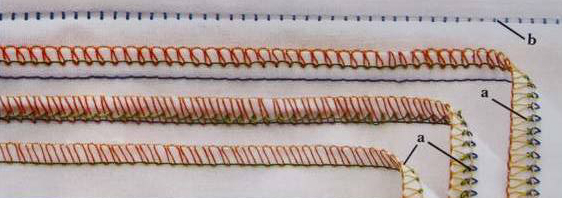 |
Tension Adjustments (Chainstitches)
| Lower Looper Thread too Tight Lower looper thread (purple) is tight and drawn on the underside of the fabric, causing puckered seam and skipped stitches. Loosen the lower looper thread tension dial until even loops are formed. If the problem is not solved, check for tight needle thread tension. |  |
| Lower Looper Thread too Loose Large, loose loops form in lower looper thread (purple), causing the seam to pull open, exposing stitches on the right side of the fabric. Tighten the lower looper thread tension dial until even loops form on the underside. |  |
| Left Needle Thread too Tight Tight left needle thread (blue) may cause puckered seams and skipped stitches. Loosen left needle thread tension dial until the fabric does not pucker. If the problem is not solved, check for tight lower looper thread tension. |  |
Left Needle Thread too Loose Left needle thread (blue) forms large loops on the underside of the fabric. Seam may pull open, exposing stitches on right side of the fabric. Tighten left needle thread tension dial until close, firm loops form on the underside. |  |
